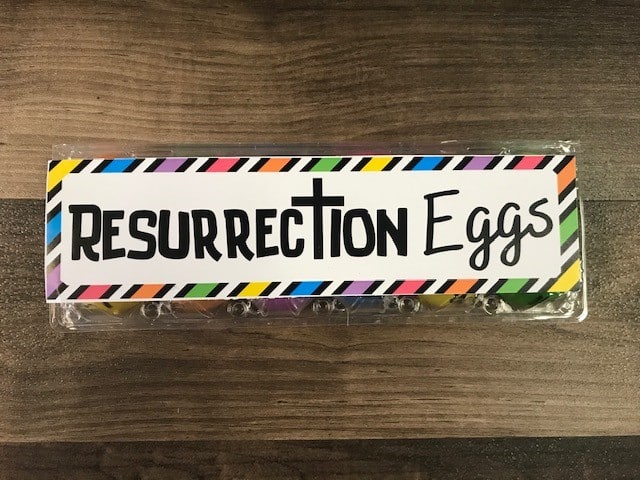
Looking for a way to share the Easter story with your kids? Resurrection Eggs are a great hands-on way to help kids learn about the death and resurrection of Jesus. If you have been wanting to make your own, but didn’t know what to put inside the eggs, you can find out how to make Resurrection Eggs here! These DIY Resurrections Eggs are simple to make and you will enjoy putting them together for your own children or for the children in your church!
Resurrection Eggs Materials
Here is what you will need for this project:
- 12-count empty egg carton (clean)
- 12 plastic Easter eggs
- Black sharpie
- Resurrection Eggs printables
- Artificial palm branch or artificial plant leaf (small clip of it)
- Small square fabric (scented with perfume)
- Silver coin
- Small cracker (I used oyster crackers)
- Fake flower petal
- Leather strip (small piece)
- Small square piece of purple cloth
- Nail (masonry nails work best because they are flat)
- Dice
- Linen Cloth
- Small stone or pebble
How to put Resurrection Eggs together
First, you will need an empty egg carton. You can use a carton you have at home. If you are doing this with the kids in your church, you can ask for donations of empty egg cartons. Or, you can use these clear plastic (and clean) cartons. I used these and they worked great!
Then, print out the Resurrection Eggs printables.
These printables include the cover and the symbols page. When printing out the symbols page, you will want to play around with the settings to make sure it fits on the inside top cover of the carton. On my printer, I had to “shrink to fit” to make it work for the plastic cartons I was using. Every carton will be different so play around with the settings for the symbols and the cover.
Cut out the cover and the symbols printable. Glue the cover to the outside of the carton. Glue the symbols printable on the inside of the carton top. The symbols printable includes a list of each item in the numbered eggs, along with a description of the item and how it relates to the Easter story. It also includes a Scripture verse so that kids and families can look up the verse that goes with the item.
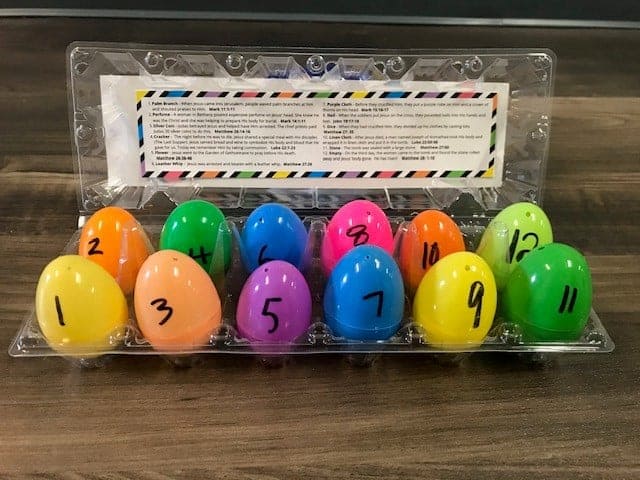
Next, number the plastic Easter eggs 1-12.
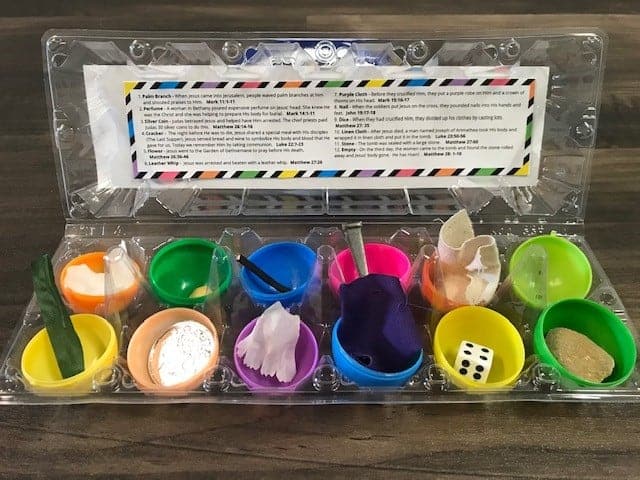
Then place each item in the corresponding number egg:
- Artificial palm branch – Cut a small piece of the artificial palm branch and place inside the number 1 egg.
- Small square piece of fabric – Cut a small piece of fabric and spray some perfume onto it and place in the number 2 egg.
- Silver Coin – If you’re doing this with your own children, you can use a dime or a nickel. If you’re doing this with your children’s ministry, you can order these fake silver coins and place in the number 3 egg.
- Cracker – I used an oyster cracker as it was small and could fit into an egg. You can also use mini saltine crackers. Place one cracker into the number 4 egg.
- Flower – To represent the Garden of Gethsemane, you will use a small piece of an artificial flower. I bought a small bunch of artificial flowers at Walmart and clipped off the petals. Place one petal into the number 5 egg.
- Leather – Since I was making these for my children’s ministry kids, I bought this pack of leather. You can also buy a smaller roll at Walmart. Cut a small strip and place in the number 6 egg.
- Purple Cloth – I bought a yard of purple cloth and cut small square pieces. Place inside the number 7 egg.
- Nail – I like to put the flat masonry nails into the eggs for the kids since they are flat and not super sharp. I bought a pack of these at Home Depot. Place one nail inside the number 8 egg.
- Dice – You can buy a pack of dice at Walmart or if you need a larger quanitity for your church kids, I bought these on Amazon. Place one die inside the number 9 egg.
- Linen Cloth – I bought a yard of linen cloth at Walmart. Cut a small square piece and place inside the number 10 egg.
- Stone – I bought a pack of small stones or pebbles at Home Depot (or you can find small ones in your yard if doing for just your family). Place one stone inside the number 11 egg.
- Empty – The number 12 egg remains empty to signify that Christ is risen. I wrote on the inside of the egg “He is Risen.”
Once all items are inside, the project is complete!
How to use them at home
I encourage families to use these DIY Resurrection Eggs all throughout the season of Lent or during Holy Week. Families can open one or two eggs a night at dinner, read the description of the item and how it relates to the story and also read the corresponding Scripture that goes with that item. After reading, discuss the story together and close in prayer.
How to use them in your Children’s Ministry
If you are using this activity with the kids at your church, you can help them make their own! Set up 13 stations (one for the egg carton and 12 for each egg). Have them go around and put the item in each egg. Place an adult at each station so they can explain to them the meaning of each item and read the Bible verse with them.
I am using Resurrection Eggs in our Resurrection Rock & Roll To-Go event this year! We are having a drive-through Easter event for families. We will have 13 stations and at each station, families will get an egg to place in their egg carton. Our pastors, college students, and youth will be helping share the Easter story with the kids at each station.
These DIY Resurrection Eggs are simple to make and a great hands-on way to share the Easter story with children. I hope you have fun sharing the life of Jesus with kids this Easter season!
For more Easter ideas for your family, check out these resources:
Resurrection Rock & Roll To-Go

